


A Rubber Ducky is essentially a USB device disguised as a harmless object (like a rubber duck) that, when plugged into a computer, acts as a keyboard, injecting keystrokes rapidly. This can be used to automate tasks, test security, or unfortunately, for malicious purposes.

Materials Needed:
- Arduino UNO Or D1 UNO (ESP8266 based)
- Micro USB cable
- USB connector (Type A male)
- Appropriate enclosure (e.g., rubber duck)
- Soldering iron and solder
- Ducky Script (text file containing commands)
- Ducky Script converter (optional)
- Arduino IDE
Now you got an idea about what we are going to do….
1. Understanding Ducky Script:
- Ducky Script is a simple scripting language used to define keystrokes and actions.
Examples of commands include:
STRING some text– Types the specified textENTER– Presses the Enter keyGUI– Presses the Windows keyDELAY 1000– Delays for 1000 milliseconds
2. Creating Your Ducky Script:
- Use a text editor to create a
.txtfile. - Write your desired commands in Ducky Script syntax.
- Example:
STRING notepad.exe
ENTER
STRING This is a test
ENTER
3. Converting Ducky Script (Optional):
- Some tools can convert Ducky Scripts to Arduino code automatically.
- This can save time, but manual conversion provides more control.
- You can use Duckduino online converter to convert Ducky script to arduino sketch easily
4.Install IDE Components
- Install Arduino IDE From the official download page.
- We need Atmel FLIP software for reflashing. For runnning Atmel FLIP, we need JDK and java runtime.
5. Hardware Setup:
1.Add HID-Keyboard library to Arduino IDE .
Download the hid-project file from the below link and Add the zip file as shown below.

2.Uploading the Sketch:
- Connect the Arduino UNO or D1 UNO to your computer via the micro USB cable.
- Open the Arduino IDE and select the correct board and port.
- Upload your compiled sketch to the Arduino.
3.Converting Arduino UNO to a HID device :
To convert the Arduino UNO to a HID device, we will flash the hexfile to atmega16u2, this chip is used as bridge between ATMEGA32 IC and the computer. We can reprogram this chip from a usb serial device to a hid device.For that you have to short the two connections as given below, Use a male-female jumper to connect one pin of the ICSP ports to the ground. Then take a male-male jumper, connect one end of the jumper to ground and touch the TX component with the other end until there is a flicker. Then touch the right side of the crystal oscillator.
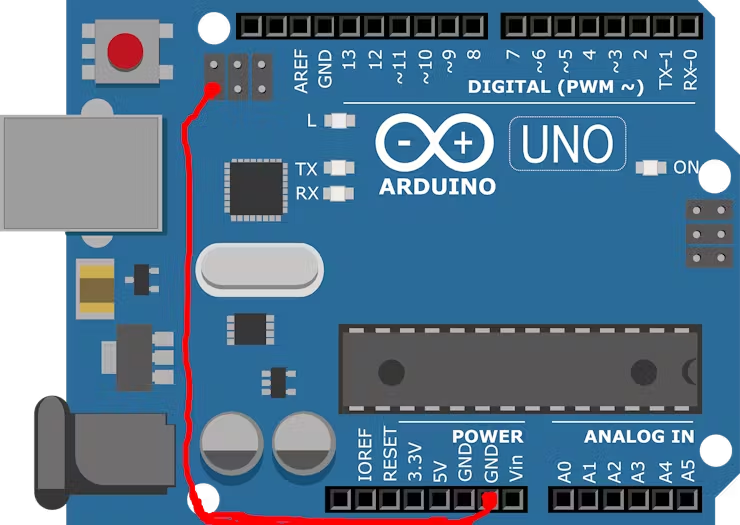
1-Connect one pin of the ICSP ports to the ground
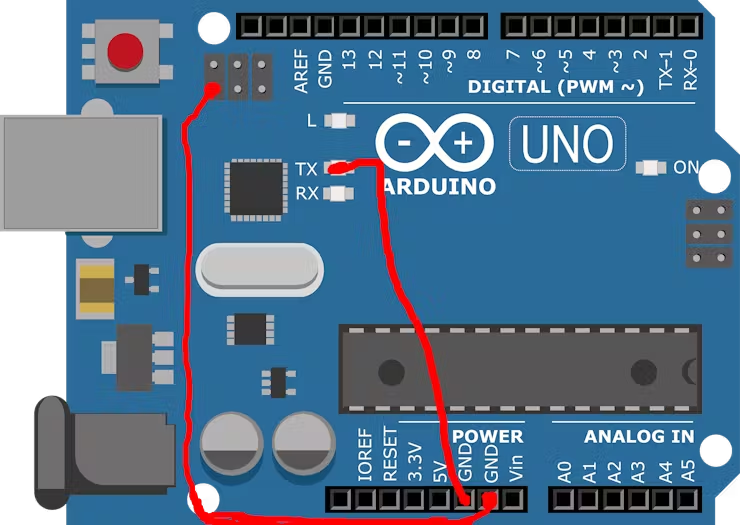
2-Connect one end of the jumper to ground and touch the TX component

3-Touch the side of the crystal oscillator.
we entered into device firmware update mode (DFU mode), so we can disconnect the jumpers. In the device manager we can see a device is detected then we have to update the driver, choose the path of ‘usb’ folder where we install the Atmel software.
Go to Flip software, then go to icon > usb > open.

- check all the four boxes(Erase, blank check, program, verify).
- Then click File > Load HEX File > select ‘Arduino-keyboard-0.3.hex’ file and click run.
- Once more short the two points foor one second like we shorted earlier and then disconnect and reconnect the arduino to the computer.
Note: If you did not perform the driver update process, an error will appear when you click open.
4.Converting D1 UNO ESP8266 to a HID device For Arduino Uno :
This is a software USB stack running on the ESP8266/ESP8285. It requires only one external resistor, between D- and 3.3V. But… here are the limitations :
- You cannot use ESP SDKs newer than 1.5.X. (As of dec-02-2016, 1.5.4 is the latest SDK that has been verified to be compatible.)
- All ESP SDK 2.0 SDKs are incompatible.
- By default, the chip expects D- on GPIO 4 and D+ on GPIO 5 – but any GPIO pair may be used. It is important to note that both D- and D+ MUST be adjacent.
- This project only operates with low-speed USB (1.5 MBit/s) ideal for making peripherals, not for fake network devices and usb-serial bridges. That said – you can still write “control” messages that communicate with the ESP8266.
- Control messages are a great way to encapsulate your data since they handle all the framing and describing what function you wish to pass data for.
The official guide will help you flash your ESP chip for keyboard and mouse use at least
Finally …. Our arduino is now works as a rubber ducky…..
To upload a different code to the ATMEGA32, such as a payload or a reverse shell, you’ll need to reflash the AtMega 16u2 as a USB serial device. Start by shorting the two points as described earlier, then open the Atmel Flip software, load the ‘Arduino-usbserial-uno.hex’ file, and click “Run.”
Afterward, disconnect and reconnect the Arduino. The board should now be recognized, allowing you to upload any sketch you desire. Once the upload is complete, you can reprogram the AtMega16u2 as a HID keyboard device.
6.Additional Considerations:
- Power Consumption: The Arduino Nano’s power consumption should be considered, especially if the device will be unplugged frequently.
- Encapsulation: The enclosure should protect the electronics while maintaining a realistic appearance.
- Security: Always be aware of the potential misuse of this device. Use it responsibly and ethically.