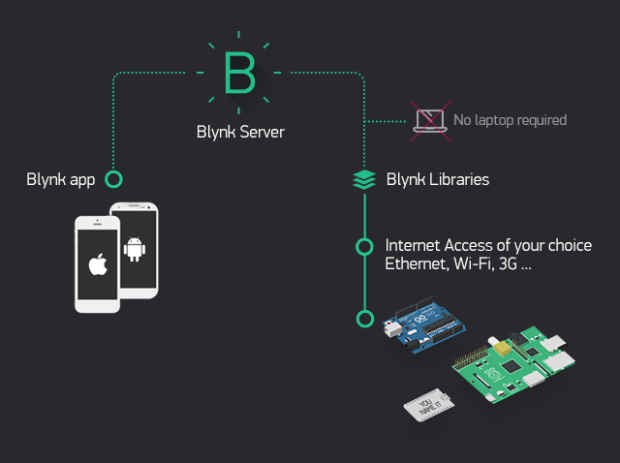
Blynk is an IoT platform that allows you to easily build mobile and web applications to control various hardware projects. It supports a wide range of microcontrollers such as Arduino, ESP8266, Raspberry Pi, and others. The platform provides a user-friendly interface for building applications, and it includes features like real-time data monitoring, cloud connectivity, and the ability to control devices remotely.
This tutorial will guide you through setting up Blynk and creating a simple project to control an LED using an ESP8266.
1. Setting Up Blynk
Step 1: Create a Blynk Account
- Download the Blynk app on your mobile device (available on Android and iOS).
- Open the app and sign up using your email address or log in if you already have an account.
Step 2: Create a New Project
- Once logged in, tap on the “+” icon to create a new project.
- Name your project (e.g., “LED Controller”).
- Select the hardware model you are using (e.g., ESP8266).
- Choose the connection type (WiFi for ESP8266).
- Tap on “Create Project.”
You will receive an authentication token via email, which will be used to connect your hardware to Blynk.
2. Setting Up the Hardware
Step 1: Install the Arduino IDE (If Not Installed)
- Download and install the Arduino IDE.
- Open the Arduino IDE.
Step 2: Install the Blynk Library
- In the Arduino IDE, go to Sketch > Include Library > Manage Libraries.
- In the Library Manager, search for “Blynk” and install the Blynk library.
Step 3: Configure the ESP8266 in Arduino IDE
- Go to File > Preferences and add the following URL in the “Additional Board Manager URLs” field:
http://arduino.esp8266.com/stable/package_esp8266com_index.json
- Go to Tools > Board > Boards Manager.
- Search for “ESP8266” and install the package.
- Select the ESP8266 board from Tools > Board (e.g., NodeMCU 1.0 or similar).
Step 4: Connect the ESP8266 to Your Computer
- Connect the ESP8266 to your computer using a USB cable.
- In the Arduino IDE, select the correct COM port from Tools > Port.
3. Programming the ESP8266 with Blynk
Step 1: Load the Blynk Sketch
- In the Arduino IDE, go to File > Examples > Blynk > Boards_WiFi.
- Select the appropriate example for your board (e.g., ESP8266_Standalone).
Step 2: Modify the Sketch
- In the sketch, find and replace the following with your information:
char auth[] = "YourAuthToken"; // Replace with your Blynk auth token
char ssid[] = "YourNetworkName"; // Replace with your WiFi SSID
char pass[] = "YourPassword"; // Replace with your WiFi password
2.If you’re controlling an LED, ensure you have an output pin defined:
int ledPin = D1; // Define the GPIO pin where the LED is connected
Step 3: Upload the Code
- Click on the Upload button in the Arduino IDE to compile and upload the code to your ESP8266.
- Open the Serial Monitor from Tools > Serial Monitor to check the connection status. The ESP8266 should connect to your WiFi and to Blynk.
4. Building the Blynk App Interface
Step 1: Add a Widget to Control the LED
- In the Blynk app, open your project.
- Tap on the “+” icon to open the widget box.
- Drag a Button widget onto your canvas.
Step 2: Configure the Button Widget
- Tap on the button widget to open its settings.
- Set the output pin to match the pin in your sketch (e.g., D1).
- Choose the Switch mode to toggle the LED on and off.
5. Testing Your Blynk Project
- Power your ESP8266 and ensure it connects to your WiFi network.
- In the Blynk app, start your project by tapping the Play button.
- Tap the button widget in the app to turn the LED on and off.
If everything is set up correctly, you should see the LED responding to the commands from your mobile device in real-time.
6. Expanding the Project
Now that you have a basic setup, you can expand your project by adding more widgets like sliders, gauges, or graphs to monitor sensor data, control multiple devices, or even create automation rules.
Conclusion
Blynk makes it easy to control and monitor your IoT projects from anywhere. With a basic understanding of the platform, you can now start building more complex applications, integrating various sensors, and creating automation routines. The flexibility of Blynk allows you to customize your IoT applications with minimal coding effort.


